Bulk Inventory Edit
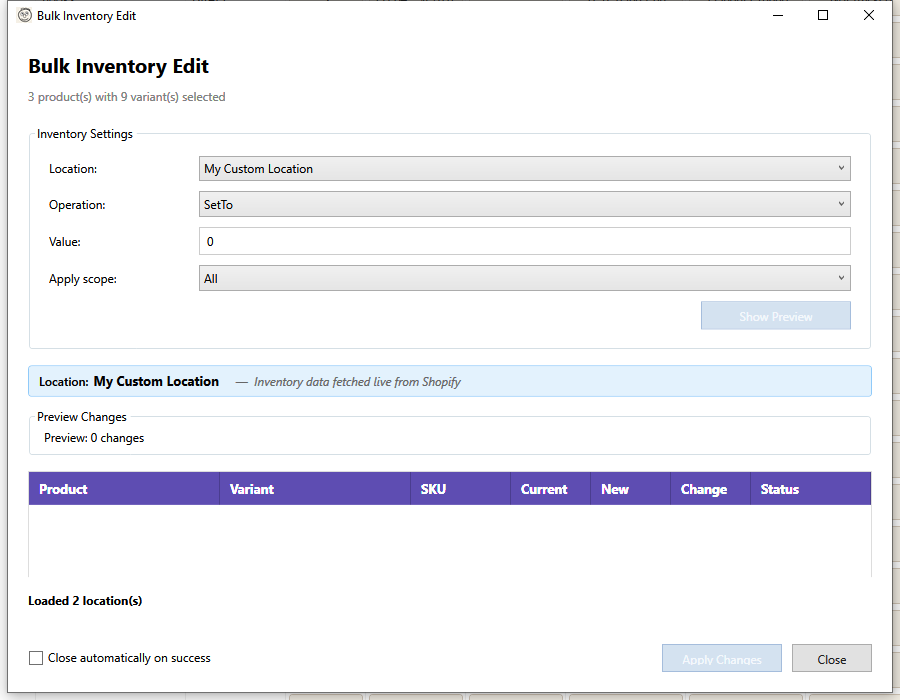
The Bulk Inventory Edit feature allows you to adjust inventory levels for multiple products and variants simultaneously.
Opening Bulk Inventory Edit
- Select one or more products in the grid
- Open using one of these methods:
- Click Targeted Bulk Edit > Inventory in the toolbar
- Right-click and select Bulk Inventory Edit
Inventory Operations
| Operation | Description | Example |
|---|---|---|
| Set to | Set inventory to a specific value | Set to 100 units |
| Increase by | Add a fixed amount | Add 50 units |
| Decrease by | Subtract a fixed amount | Remove 25 units |
| Increase by % | Add percentage of current | +20%: 100 → 120 |
| Decrease by % | Subtract percentage | -10%: 100 → 90 |
Location Selection
If you have multiple inventory locations:
- Select the target location from the dropdown
- Changes apply only to that location
- Other locations remain unchanged
All Locations
Select "All Locations" to apply changes across all inventory locations.
Preview Changes
Always preview before applying:
- Configure your operation and value
- Select the location
- Click Preview
- Review the calculated changes
The preview shows:
| Column | Description |
|---|---|
| Product/Variant | Item being modified |
| Location | Inventory location |
| Current | Current inventory level |
| New | Calculated new level |
| Change | Difference (+/-) |
Applying Changes
- Review the preview carefully
- Click Apply
- Confirm when prompted
- Wait for changes to sync
Note: Inventory backups are created automatically before applying changes.
Scope Options
Choose which variants to modify:
- Selected products only - All variants of selected products
- Specific variants - Choose individual variants
- Out of stock only - Only variants with 0 inventory
- Low stock only - Below specified threshold
Inventory Tracking
Tracked vs Untracked
- Tracked inventory - Shopify manages stock levels
- Untracked inventory - Unlimited availability
Bulk inventory edit only affects tracked variants.
Products Without Tracking
Products with inventory tracking disabled will:
- Appear in the list with "Not tracked" status
- Be skipped during the apply operation
- Show a note in the results
Variants Not Stocked at Location
When viewing the preview, some variants may show as "Not stocked" at the selected location. This means the variant exists but inventory tracking isn't active at that location.
What you'll see:
- Status column shows "Not stocked"
- Row appears grayed out
- A checkbox appears below the preview: "Activate X variant(s) at this location before updating"
To include these variants:
- Check the Activate variants at this location checkbox
- The not-stocked variants will now be included in the operation
- Click Apply Changes
- HF Product Manager will first activate inventory tracking, then set the quantity
Note: Activating variants at a location is required before you can set their inventory quantity at that location.
Using Activate at Location Dialog
For more control over activating variants, use the dedicated Activate at Location dialog:
- Select products with variants needing activation
- Go to Targeted Bulk Edit > Activate at Location
- Select the target location
- Click Preview to see which variants will be activated
- Optionally set an initial inventory quantity
- Click Activate
This dialog shows:
- Variants already active (will be skipped)
- Variants that will be activated
- Variants not tracked (cannot be activated)
Negative Inventory
Shopify allows negative inventory in some cases:
- Overselling enabled - Can go negative
- Overselling disabled - Stops at 0
The preview shows warnings if operations would result in negative values.
Best Practices
- Preview first - Always review changes before applying
- Work by location - Update one location at a time for accuracy
- Regular counts - Schedule periodic inventory reconciliation
- Use adjustments - Increase/decrease is safer than "Set to"
- Check backups - Know how to restore if needed
Common Scenarios
Restocking
After receiving inventory:
- Select products that were restocked
- Choose "Increase by" operation
- Enter the quantity received
- Preview and apply
Stocktake Adjustment
After a physical inventory count:
- Select products to update
- Choose "Set to" operation
- Enter actual count
- Preview and apply
Seasonal Reduction
Reducing inventory for end-of-season:
- Select seasonal products
- Choose "Decrease by" operation
- Enter reduction amount
- Preview and apply
Restoring from Backup
If you need to undo changes:
- Go to Toolbar > Recovery > Undo Field Changes
- Filter by "Inventory" type
- Find the backup by date/time
- Click Restore
- Confirm the restoration
Multi-Location Workflow
For stores with multiple locations:
- Start with primary location
- Apply changes
- Switch to next location
- Repeat as needed
Or use "All Locations" for uniform changes.
Troubleshooting
"No products selected"
Select at least one product in the grid before opening Bulk Inventory Edit.
"Some variants skipped"
Variants may be skipped if:
- Inventory tracking is disabled
- Variant is managed by another app
- Insufficient permissions
"Inventory not updating"
Check for:
- Products managed by inventory apps (Stocky, etc.)
- Location-specific restrictions
- API rate limiting (wait and retry)
"Negative inventory warning"
If "Set to" or "Decrease by" would result in negative inventory:
- Review the affected items
- Adjust the operation value
- Or enable overselling in Shopify
Keyboard Shortcuts
| Shortcut | Action |
|---|---|
| Enter | Apply focused operation |
| Escape | Close dialog |
| Tab | Move between fields |
Inventory Sync
Inventory data syncs separately from product data. While product sync downloads titles, descriptions, prices, and other product fields, inventory levels are fetched in a dedicated inventory sync step.
Sync Strategy
HF Product Manager automatically selects the best method for downloading inventory:
- Standard API -- Used for smaller stores. Fetches inventory per location in batches using paginated GraphQL queries.
- Bulk Operations API -- Used for stores with 5,000 or more total inventory entries (variants multiplied by locations). Downloads all inventory in a single bulk job using Shopify's JSONL export, which is significantly faster for large catalogs.
The threshold is calculated as variant count x location count. For example, a store with 2,000 variants and 3 locations has 6,000 inventory entries and will use the Bulk Operations path.
Sync Modes
Configure when inventory syncs in Settings > Sync:
| Mode | Behavior |
|---|---|
| After Product Sync (default) | Inventory syncs automatically after each product sync completes |
| Manual Only | Inventory only syncs when you explicitly trigger it from the toolbar |
Stale Inventory Warning
When inventory sync mode is set to Manual Only, a warning banner appears in the status bar if your cached inventory data is more than 24 hours old. This reminds you that displayed quantities may not reflect recent orders or adjustments.
To dismiss the warning, run an inventory sync from the toolbar or switch the sync mode to After Product Sync in Settings.